|
|
The ClassMarker Result Tab |
|
The Result Tabs are used to graphically analyse the results of a Cross-Validation or Train and Test analysis. They contain a subset of the totality of the genes that discriminates the classes (the marker genes). In a Result Tab you can :
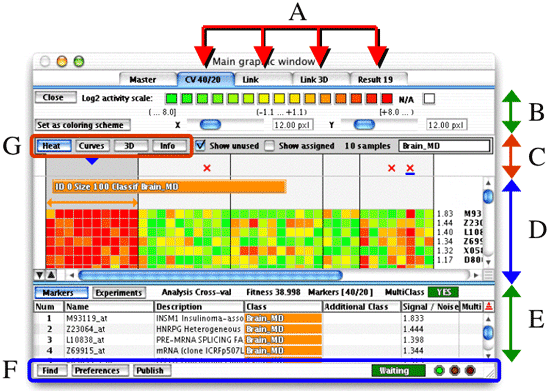
All the tabs shown by the A arrows are result tabs, while the leftmost tab is the Master Tab. The “B Part”
of a result pane The “C Part” of a result pane This part shows the same class separation as the Master Tab. But unlike the Master Tab, you are not able to do any class changes in this tab, because the subset of markers shown here depends on the class definition. There are four buttons allowing you to change the visualization of the result. (the G part in the previous figure). The possible modes are:
On the right of these buttons, there are two check boxes, the first one is the “Show Assigned” check box. It will replace the cross-validation failure crosses (there are three of them in the previous figure) by the color of the assigned class. The next check box gives you the opportunity to show or hide unused classes in this result tab. The “D Part” of a result pane This part depends on the mode chosen for visualization in the C part, in the previous figure the selected mode is “Heat” and this part displays the group of markers as a heat map. The “E Part” of a result pane This part has two modes, it displays the samples (Experiments) table or the marker gene (Markers) table. To switch mode click the appropriate button on top of the table. Lines corresponding to samples masked out from the analysis are hatched. In the previous figure, the mode is set to "Markers". The “F Part” of a result pane Learn more on window footer buttons here.
Show general information on ClassMarker's Main Window. |