| The heat map view of the Master Tab shows all
the genes in the file. If a particular gene did not pass the filter,
its corresponding line is colored light cyan.You can use the button in the
top panel to customize the view.
You can switch from one class to another by clicking in the appropriate
part of the class (learn more)
or using the Left/Right keys of the keyboard.
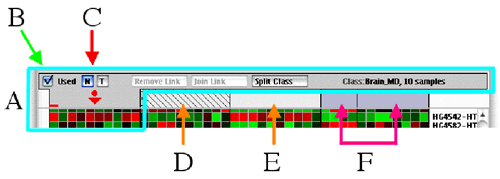
You can use the buttons (B and C) of the selected
class (A) to specify the class attributes.
Specifying class attributes
There are multiple attributes possible for a
class. To change them, you must select the Master
Tab, then select the target
class.
The Used check box specifies if the
class is to be taken into account in the analysis. If you uncheck this
box, this class will appear hatched, as the class shown by the D
arrow in the figure, and the class will be excluded from analysis.
The next two buttons are used to specify if the
class is a normal (N button) or a train class (T
button). A train class is colored in blue, as the two classes shown by
the F arrow.
You can also disable (mask out) a single sample
by right-clicking its heat map and choosing the Set Unused
option in the popup menu. The sample will be colored in gray, and the
data of this sample will be excluded from analysis. To include a masked
sample in analysis, right-click again its heat map and select the Set
Used option in the popup menu.
You can change the name of a class by selecting
it, clicking the name (on the right of part A in the figure) and choosing
a new name.
- The "Remove Link" button will remove a
previously made link (learn more on links here).
- The "Join Link" button will join all the
classes linked into a single one (learn more on links here).
- The "Split Class" button will split the
selected class in two (learn more on how to split a class here).
|