| The ArrayMiner ClassMarker’s
main interface consists of a single window that contains multiple tabs.
There are two kinds of tab:
- The Master Tab is always accessible
and is always the leftmost tab in the window. It is used to prepare
your data for analysis (this tab is shown by the A arrow in
the figure below).
- The Result Tabs, each showing
the result of an analysis initiated from the Master Tab (there are
three Result Tabs in the figure, shown by the B arrows).
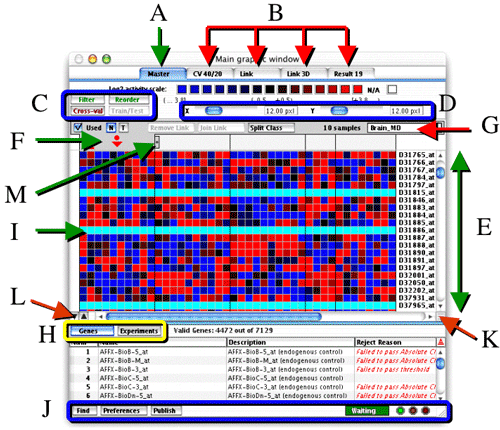
ClassMarker interface
- A : The selected tab, in this case this is the Master
Tab.
- B : The Result
Tabs, these are result tabs, you can rename them by double clicking
on them.
- C: These are the main controls of the master tab,
green buttons are for filtering and reordering of data, red ones are
for analyzing (more on this).
- D: This part contains preferences for the currently
selected view of your data. In this case, this will expand/shrink the
size of each rectangle in the heat map (more
on this).
- E: You will find in most cases the genes vertically
and the experiments horizontally.
- F: This is the selected class, shown by a red arrow
in the master tab and by a blue one in result tabs. Learn more on class
selection here.
- G: This part shows details about the selected class
and the available actions for it.
- H: These two buttons determine the view of the bottom
table. In most cases, you can choose between the experiment table and
the gene table.
- I: This gene didn’t pass the filtering
and is excluded from analysis.
- J:This is the classmarker
window footer.
- L: These two buttons maximize and minimize frames.
- K: Drag this box to resize frames.
- M: This anchor can be dragged to move a class separator
and modify the class position.(Master Tab only). To learn more
on class creation click here.
|