|
- To learn more on the A part click here
- To learn more on the B part click here
- To learn more on the C part click here
- To learn more on the D part click here
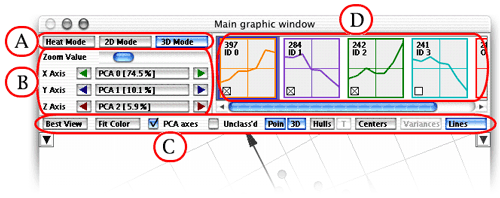
The A Part
- The "Heat Mode" button switches
the window to the "Heat" mode
- The "2D Mode" button switches the
window to the "2D" mode
- The "3D Mode" button switches the
window to the "3D" mode
The B Part
These buttons allow you to
select the axes that are used for drawing the 2D projection of the data.
The middle button shows the data attribute that is taken for the axis.
Clicking the middle button brings up a menu of all the attributes to
let you choose the one desired. The triangle buttons on the left and
right allow for an easy cycling among the attributes. The graphic of
the data is always updated immediately to reflect the change of the
axes.
The C Part
- The "Best View" shows the data in the most significant
axes.
- The "Fit color" button shows the profiles in the
Profile Panel in colors that depend on the value of the fit of the gene
within its cluster (for Fit, see the List
Panel).
- The "PCA axes" button allows you to switch to the
PCA display mode. In this mode,
the axes are no longer gene columns, but the eigenvectors of the data.
The PCA mode amplifies the amount of information shown.
- The "Unclass'd" checkbox allows you to show / hide
genes that are not assigned to any of the clusters (i.e., they are assigned
to the noise cluster, gaussian
model only). These genes are represented by red crosses.
- The "Points" button shows/hides the points (the cluster
envelopes alone may convey enough information)
- The button on the right of Points (showing "3D" in
the screenshot above) lets you choose the display mode of the genes.
There are five options available:
- "3D" represents genes as 3D spheres. This is
visually the most appealing and gives a good sense of the perspective,
but may be rather slow with thousands of genes to display
- "Flt" represents genes as flat circles. This
is much faster to draw than 3D spheres (useful on slow machines),
but conveys less visual information
- "Dn", "Dl" and "Dv"
yield a density graph,
respectively normal, light or very light.
- The "Show hulls" button shows/hides the convex hull
of clusters
- The "T" button changes the hull mode to translucent,
giving you an additional feeling of the respective positions of the
clusters
- The "Names" button shows/hides the centers of the
clusters, as well as their names
(labels) if present
- The "Variances" button shows/hides the variance of
the clusters by drawing an ellipsoid centered on the average of the
cluster with a radius equal to the variance (this button is disabled
in PCA mode)
- The "Lines" button shows/hides lines joining the
center of each clusters with all the genes belonging to the cluster
The D Part
- The "Unclass'd" button allows you to show / hide
genes which not assigned to any of the clusters (i.e., they are assigned
to the noise cluster). These genes are represented by red crosses.
- The "PCA axes" button allows you to switch to the
PCA display mode. In this mode, the axes are no longer gene columns,
but the eigenvectors of the data. The PCA
mode amplifies the amount of information shown.
- The "Color" button shows a coloring
scheme panel. This panel gives you the possibility to load a classification
file (amc extension) and
color the genes with it. You can load one or more classifications
by clicking the open button in the Panel and select one of them by
clicking on the corresponding numbered tab at the bottom of the panel.
If you don't want to use any coloring scheme, simply click on the
"N" tab on the bottom left part of the panel. The panel
is hidden by a second click on the green triangle.
|