|
|
How do I create classes ? |
| 1) Specifying classes in the input file.
You can directly specify classes in your file by adding the name of the class in front of the experiment name separated by a "|" character (also called the "pipe" character) in your csv file, as shown in the following figure. (Note that on the Macintosh US keyboard, the "pipe" character is obtained using the shortcut alt+shift+L)
The above dataset has two classes :
Note : It is not necessary to use numbers as sample identifiers, you can name the samples anything you want. |
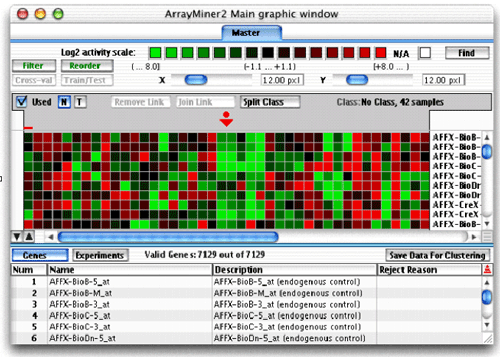
| 2) Specifying classes using the ClassMarker interface. A better way to define sample classes is to use the ClassMarker interface. You must select the Master Tab to perform any operation on classes. If your data file has no classes defined, ArrayMiner will interpret them as a single class as shown in the figure below.You can check the order of your columns by turning the bottom table to the experiment mode by clicking on the "Experiments" button. If necessary, reorder them with the reorder tool of the Master Tab.
To introduce a new class, click on the split button (shown by the C arrow in the next screen shot), it will split the current class into two classes.
As shown in the previous screenshot,
there are now two classes (shown by the two arrows marked A and a
black separator line shown by the arrow B). To select
a class click on the A part of the window, the name and the number
of samples in that class will appear in the field D. To rename the class,
click on its name (field D). To move the class separator, simply
drag the E handle to the right or to the left. To help you position the
class separation, the identities of the samples on the left and on the
right of the separation are shown while dragging.
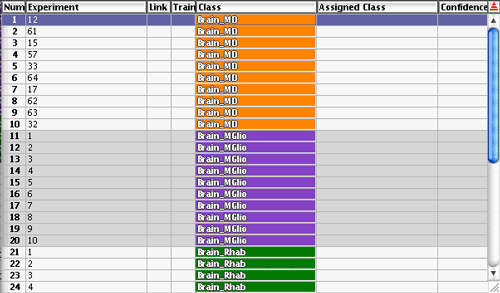
In this screenshot of an experiment table, you can view the three first classes of the file. The first one is named Brain_MD and consists of ten samples. The second class is named Brain_MGlio and also has ten samples. The third class is named Brain_Rhab, etc.
|