|
If you want to apply a filter to your data, you
need to specify the appropriate values in the Filter Mode. To access the
filter editor, simply click the Filter button in the
top left part of the window in the Master
Tab.
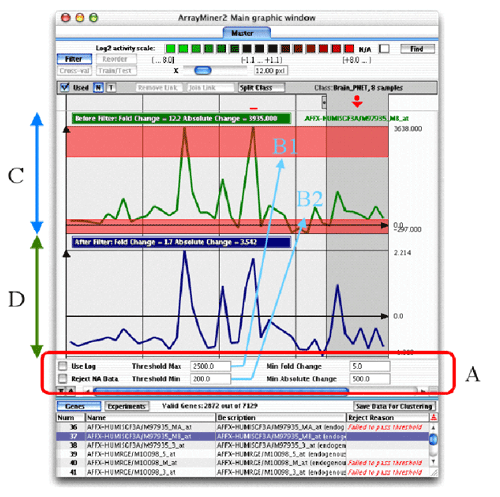
Filter Mode of the Master Tab
The six parameters of the filter are contained in the A part of the previous
figure.
- Use log: Will apply logarithm to all expression
values in the dataset. This is done after the other filters below have
been applied, but before any other further processing
- Reject NA Data: Will reject all genes with at least
one missing value
- Threshold max: Will define a max value for the ceiling
of your activities. Any expression value exceeding the threshold will
be replaced by the value of the threshold. If more than half of
the measurements of one gene exceeds the floor or the ceiling, the gene
will be ignored.
- Threshold min: Same as Threshold max, but defines
the floor: any expression value lower than the threshold will be replaced
by the threshold. If more than half of the measurements of one gene
exceeds the floor or the ceiling, the gene will be ignored.
- Min Fold Change: The fold change is the ratio
between the highest and the lowest expression measured for the gene.
All genes with a fold change inferior to this value will be ignored.
- Min Absolute Change: The absolute change is the
difference between the highest and the lowest expression measured
for the gene. All genes with an absolute change inferior to this value
will be ignored.
| Note |
In order to be able to compare correctly
the different experiments, each experiment is normalized. The average
of the experiment is set to 0 and all the gene values for this experiment
are divided by the standard deviation of the experiment. To increase
the visual impact of each gene profile, each gene value is divided
by its gene standard deviation value. This "visualization"
value is not used for computation. You can access all these values
for a particular gene in the Raw Data
Window. |
The upper part of the window
shows the selected gene before (panel C) and after filtering
(panel D). You can change the selected gene by clicking
the appropriate line in the gene table in the bottom of the window (the
table must be in "Genes" mode). The table will also inform
you on the rejection reason of a particular gene, in the rightmost column.
The number of valid genes (i.e. genes not rejected by the filter) is shown
on top of the table.
If a gene has values that exceed the maximum or
the minimum threshold, a part of the gene will appear red, as shown in
the previous figure.
To exit the filtering mode, simply click once
more on the highlighted Filter button.
When you return to the Master
Tab, rejected genes will be colored light cyan in the heat
map.
|