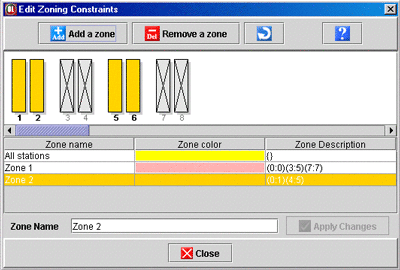
The Zoning Window
The purpose of this dialog
is to define zones of workstations. A zone is a subset of the workstations,
and typically pertains to physical constraints (such as space requirements)
under which the line will operate. An operation can be assigned to an
existing zone, which will constraint the operation to be assigned to
a workstation within that zone (see also movable/unmovable
operations). To pop up the zoning window, simply choose the "Zoning"
item in the line menu.
|
Note |
An operation already assigned to
a workstation can be assigned to a zone only if its workstation
is in that zone. |
|
By default, all operations are assigned to the
zone "All stations" that includes all workstation
(that zone is not editable). The selected zone is drawn in the middle
graph, where workstations are represented by color bars.
To add a new zone, click the "Add a
zone" button. To define properties of a zone, select the
zone in the list and click on the graph bar to enable (zone colored)
or disable (light gray colored) a workstation. Once you are
finished, simply click on the "Apply changes"
button to change the zone definition.
To assign an operation to a zone,
select the operation in the Operation
Tab and change its zone using the zone combo box in the operation
properties panel.
You can also assign a zone to a selection
of operations by right-clicking one of the selected operations in
the Operation Tab, and choosing
the appropriate menu option.
|
Note |
When you click on the "Apply"
button, OptiLine checks whether the workstations selected
for the zone are compatible with the current model. For
example, if you disable a workstation for the "Zone
1" while an operation belonging to this zone
is assigned to the disabled workstation, OptiLine will pop
up an error message. |
|
