|
To invoke the heat map publisher,
simply right-click on the heat map in the main
window and choose the save image area option. You can also use the
publish button in the footer
when the display mode is set to heat
map.
| NOTE |
Only the selected
clusters are included in the resulting image, giving you the
opportunity to select only the clusters you wish to publish
in the image.
|
|

Heat Map Pubisher Window
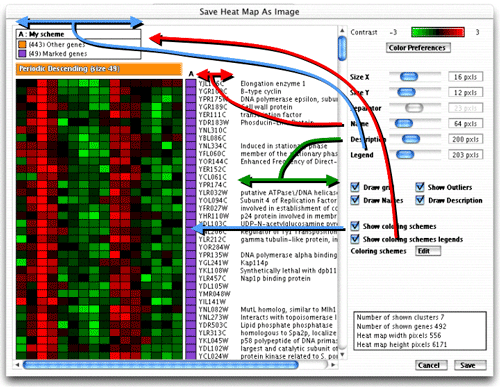
The window is divided into two parts.
The left part displays a preview of the heat map and the right part the
controls. You can click on the color gradient to adjust the heat map contrast.
Use the "Color Preferences"
button to edit the cluster colors.
- Size X : This slider determines the width in pixels
of each heat map cell
- Size Y: This slider determines the height in pixels
of each heat map cell
- Separator : This slider determines the amount of
space between classes, if any (more on this here).
This slider is enabled when there is at least one class separator
- Name : This slider determines the maximum width in
pixels allowed to draw the gene name (See the red arrow above)
- Description : This slider determines the maximum
width in pixels allowed to draw the gene description (See the green
arrow above). This slider is enabled when the height of the heat map
cell is greater than or equal to 12 pixels
- Legend : This slider determines the width in pixels
of each coloring scheme legend (See the blue arrow below). This slider
is enabled when the height of an heat map cell is greater than or equal
to 12 pixels
- Draw Grid : This checkbox will surround each heat
map cell with a black frame
- Show outliers : This checkbox when selected will
add the outliers cluster to the heat map. (Gaussian
model only)
- Draw Names : This checkbox will show/hide gene names
- Draw Descriptions : This checkbox will show/hide
gene descriptions
- Show Coloring Scheme : This checkbox will add a coloring
scheme column to the right of the heat map (See the blue arrow below)
This checkbox is enabled when at least one coloring scheme is loaded
in the coloring scheme
panel
- Show Coloring scheme legends : This checkbox will
add a legend at the beginning of the heat map
- Edit : This button lets you choose the displayed
coloring schemes when more than one are loaded in the coloring scheme
panel
The right bottom frame displays a summary the
heat map and the resulting image.
|