The cycle time dialog
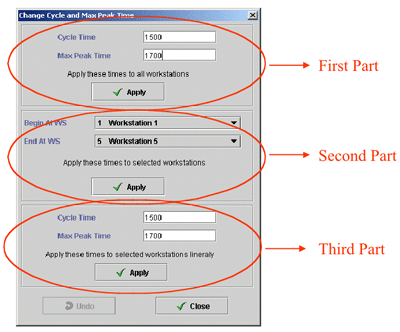
Cycle Time Dialog

    This view gives you the opportunity to edit the cycle and max peak time of some or all workstations.

That window contains three parts.
  • The first part allows you to fix the cycle time and the max peak time for the entire line. To do this, you just have to introduce the cycle time and the max peak time of your choice into the two edit fields.
  • The second part allows you to fix the cycle time and the max peak time for a given set of consecutive workstations. To do this, you just have to select the first workstation with the “Begin at WS” combo box and the last workstation with the “End at WS” combobox, and then click on the "Apply" button corresponding to the second part of the window. The system will apply the cycle time and max peak time you have introduced in the selected workstation interval.
  • The third part allows you to define a linear increase or decrease from the workstation selected in the “Begin at WS” combo box to the workstation selected at the “End at WS” combo box. To do this, you have to:
    - Define a starting value for your cycle time and max peak time, this is done by entering your values in the first part of the window.
    - Define an ending value for the cycle time and the max peak time. This is done by entering a cycle time and a max peak time in the third part of the window.
    - Click on the “Apply” button of the third part of the window.

Once you have defined all your cycle and max peak time settings, you can leave that window by clicking on the “Close” button.