|
The "Width" and "Height"
fields set the size of the saved image, using the measurement units on
the right of the two fields. When the measurement units are changed, the
contents of Width and Height change accordingly. The basic measurement
units are pixels, which means that entering a measurement in other units
may modify the entered size to reflect the closest number of pixels.
In some cases, such as when saving the contents
of the 3D cube, the Height field is disabled. This is because in those
cases the height of the image must equal its width. Accordingly, changing
the Width sets the Height to the same value. When saving the whole contents
of a window, both the width and the height of the resulting file are fixed.
Most window areas have minimal and maximal limitations
on the width and height of the saved file. In case a value entered would
yield a violation of such a constraint, the values are modified to be
as close as possible to the requested sizes within the imposed limits.
Checking the "Keep aspect ratio"
check box insures that changing either Width or Height of the image is
automatically followed by the corresponding change in the other parameter,
so that the ratio of the two is the same as before the change. If the
checkbox is cleared, Width and Height can be set independently.
The "File type" combo governs
how the image will be saved:
- "Windows bitmap (BMP)" will generate a BMP file. These files
are very common on PCs and store the image exactly as it is drawn, but
tend to be rather large. No further setting is available for this file
type, so the "Quality" combo (see below) is disabled and its
setting is disregarded.
- "Jpeg (JPG)" will generate a JPG file. These files are readable
by many systems (e.g. Macintosh) and may be made quite small. On the
other hand, in comparison to a Bitmap, they may lead to some loss of
quality of the image. This can be controlled by the setting of the "Quality"
combo.
- "Copy to Clipboard" does not actually generate a file at
all, but copies the image into the system Clipboard. From there, it
can be retrieved in most software (such as a wordprocessor) by Edit/Paste.
Like with the Bitmap option, the setting of the "Quality"
combo is disregarded.
When applicable (e.g. with Jpeg files), the "Quality"
combo governs the quality, i.e. degree of fidelity, with which the image
will be saved. Higher qualities yield close copies of the image, while
lower qualities yield small image files.
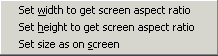
Right-clicking the dialog box brings up the following
popup menu:
The "Set width to get screen aspect ratio"
option sets the width of the image in the file to be saved to a value
that yields the same width/height ratio as the one currently shown on-screen.
This is useful for getting several images of the same height, yet each
with the same proportions as in ArrayMiner's windows. In case the constraints
on the image size would be violated, the height of the image is adjusted
accordingly.
The "Set height to get screen aspect ratio"
option sets the height of the image in the file to be saved to a value
that yields the same width/height ratio as the one currently shown on-screen.
This is useful for getting several images of the same width, yet each
with the same proportions as in ArrayMiner's windows. In case the constraints
on the image size would be violated, the width of the image is adjusted
accordingly.
The "Set size as on screen" option
sets the both the width and the height of the image in the file to be
saved to the size currently shown on-screen. This is usful for getting
several images of the same height yet each with the same proportions as
in ArrayMiner's windows. In case the constraints on the image size would
be violated, the height of the image is adjusted accordingly.
Note: some or all options in the popup menu may
be unapplicable in some contexts, in which case they do not appear.
The "Ok" button proceeds with
the save, prompting you to specify the file to save the image to, or confirming
that the image was copied to the system Clipboard. The "Cancel"
button cancels the save. The "Help" button brings up
this help page.
|